
Chasing the Northern Lights

Captured on a FujiFilm X T-2
Wispy strands of lights illuminate the sky in ethereal colors- hues of green and pink take my breath away- making all the stressful work I put into planning this trip melt into the snow around me.
This is a guide to increasing your chances to seeing and capturing the Northern Lights including where to go, when to go and how to best capture the lights as an amateur photographer.
Where to go
Chasing our dream to see the Northern Lights, Asma Al Jailani- founder and editor of A Reading Kabocha, great friend and amazing poet- and I originally planned on visiting Iceland. However, after some research, we concluded that visiting Norway- Tromso specifically- would give us the best chance of enjoying this atmospheric phenomenon in action due to location and accessibility.
The most accessible place to see the lights is Reykjavik - a major Icelandic city with ok visibility- while the best place to see the lights is Svalbard- a remote Norwegian archipelago. For those living closer to North America, some parts of Canada offer good visibility and for those closer to Australia, a similar phenomenon, the Southern Lights, can be viewed in New Zealand.
We picked Tromso as it increased our chances of seeing the lights while keeping the location relatively convenient, relatively here being the main word. You will need to get out of the city and far from artificial light in order to see the Aurora Borealis; our tour operator sent us to Camp Tamok, about 80 mins away from Tromso.
When to go
The lights are actually available year-round but they are only visible during the wintertime. The Aurora Borealis is most visible between late September and late March, however, there is no guarantee that you will see the lights. Even with advanced weather tracking tools, visibility can only be estimated 4 days in advance, so we were really lucky that the skies decided to put a show on for us.
We planned our trek in early February as it was convenient for us and we got a good deal on the plane tickets. In case we missed the lights, we packed our schedule with several other activities which I will elaborate on in my upcoming posts.
Seeing the Aurora Borealis
The biggest head fake in the history of the world is that everyone posts photos of the northern lights and yet not many sources makes it absolutely clear that seeing the Aurora Borealis with the naked eye is extremely difficult.
All those photos of bright green skies with hues of pink? Stunning, but that is not what you will see with your eyes. With a level 4 Aurora or higher you can see some feint greens and pinks but for the most part your eye only sees grey shadows. The longer you try to see only with your eyes, the better they will adjust to the light and you may see a little more clearly, assuming the Aurora will remain for a long time and grow stronger throughout the night.

Captured on an iPhone 6s
You will need a camera in order to truly experience the lights. They are fast-moving and require special settings in order to achieve the best images. I am not a professional photographer so I will leave you to research that on your own. Also, any tour guide who is familiar with photographing the lights will be able to adjust your camera for the conditions of the night.
Photographing the Aurora Borealis
We had an iPhone 6s, a digital camera, the Canon SX720 HS and a DSLR, the FujiFilm X T-2 camera and I have examples of what your photo would look like in each case. Obviously, I spent a lot of time taking photos but I tried to enjoy the lights without my camera as well.
With the regular iPhone camera app, you are unlikely to capture anything, all my shots were pure black. I found that I could see the lights better than the camera could capture them. I downloaded an app called Northern Lights Photo Taker and I got a couple of decent images using that but I had to stay super still which is difficult in -16C weather unless you have an iPhone tripod which I did not.
In addition, iPhones are not made for the cold and you will likely quickly find that your phone is drained despite the fact that it was full when you first started taking photos.

Captured on an iPhone 6s
On the Canon SX720 HS, I got some decent images using a tripod but I could not properly control the settings to optimize the photos due to the constraints of the camera. Keep in mind that as the lights moved, the intensity changed as well so while these were all taken on the same night, the strength of the light was not the same throughout.
This camera by far had the best battery power of the group and it was the most flexible in terms of what we could capture throughout the trip. It isn't too large so I could carry it around with me ensuring a better shot than my iPhone while also allowing me to save on using up my phone's battery.

Captured on Canon SX720 HS
The best shots of the night undoubtedly came from the FujiFilm X T-2 that Asma had the wherewithal to borrow. It was easier for our guide to put in the optimal settings and, with a tripod (also Asma's idea), all we had to do was point and shoot then look at the screen to find out what we captured.
Asma was kind enough to let me use the camera a couple of times but she definitely got the lion's share of these beautiful photos (her accounts are included below if you want to see them). I will say though that the battery did drain quite quickly and due to the size of the camera, and our fear of breaking it, other than the Northern Lights trek, we opted to keep it safe at the hotel.

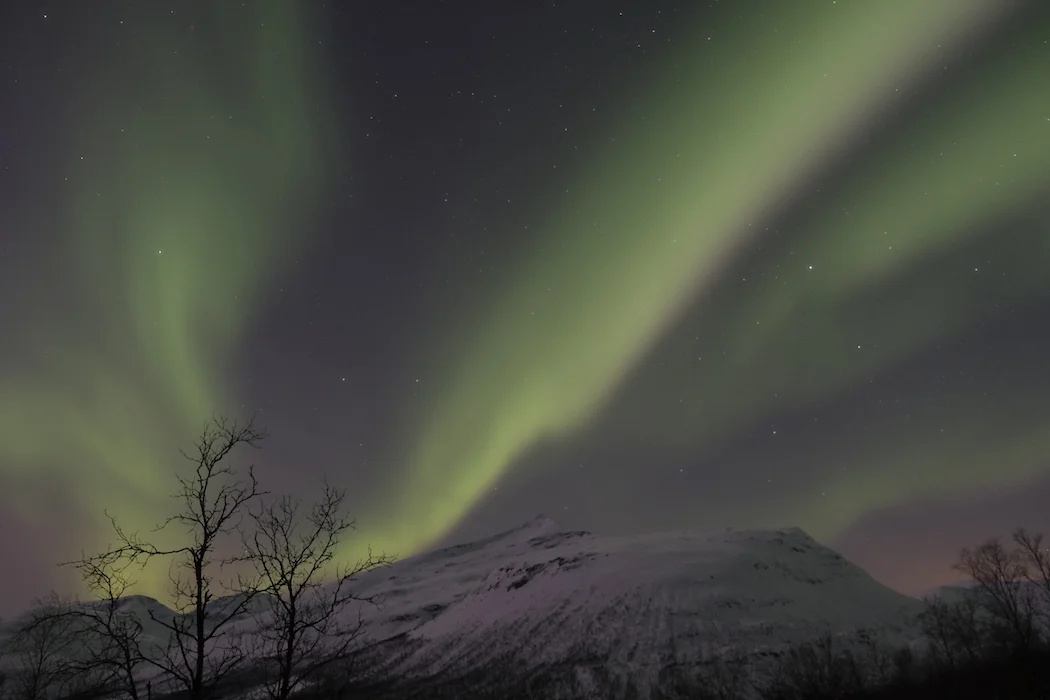
Captured on a FujiFilm X T-2
Lessons learned:
1- Wear warm clothing that you can move in, the tour operators should provide insulated suits, but you should still wear something warm inside that doesn't restrict your movement (don't forget socks and gloves)
2- Rent, buy or borrow a DSLR camera so you can truly capture the night, however, there is something to be said about enjoying the moment and going camera-free (if you dare)
3- Bring a back-up battery for you camera/phone- the camp we were at had no electricity- on a related note, avoid posting any images live because your phone will struggle to find connectivity which will further drain it
4-Bring a tripod with you so that your images are steady and clear- the best shots tend to be taken from a low angle as it allows you to include trees, people or mountains to contrast with the sky so a lightweight tripod is fine and easier to carry than a heavy duty one
You can find Asma Al Jailani on, Instagram, twitter and on her book reviewing website, she also occasionally writes for The National.


